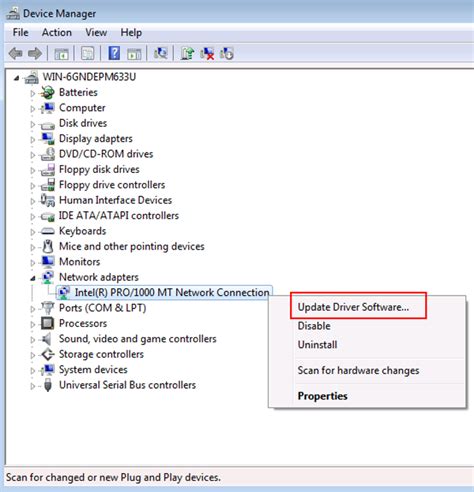
Toolbar paint
Author: N | 2025-04-24
Toolbar Paint is specifically targeted at developers who wish to design their own toolbar button graphics. It can open toolbar bitmaps with up to 64 buttons and allows you to visually design a toolbar using a wide selection of editing tools. Addition toolbar, paint, toolbar paint, paint toolbar paint, toolbar paint toolbar, - Image Editors - Multimedia Graphics Toolbar Paint - Free
Toolbar Paint 1. free download. Toolbar Paint was
Toolbars contain too many text labels making them too long to display on one line. In Mari 4.0, the tool's Tool Properties toolbars have been revisited. Icons have replaced text labels, dropdowns have been replaced with checkboxes, a brush splat is used for all painting tools, and so on. For more information on the Tool Properties toolbar, see Toolbars. Ptex and Vector Painting Toolbars In Mari 3.0, both Ptex and Vector Painting toolbars are displayed in Mari default layout. In Mari 4.0, both Ptex and Vector Painting toolbars are hidden by default. You can access them through the toolbar's right-click menu. See Toolbars. Painting in Mari In Mari 3.3, the Blending modes display in a long dropdown menu taking a lot of space and making it hard to see what Blending mode to use. In Mari 4.0, Blending modes have been categorized making them easier to navigate to in the dropdown menu. See Paint Blending Modes. Using the Paint Buffer In Mari 3.3, the Painting toolbar only contains one tool that clears unbaked paint. In Mari 4.0, the Painting toolbar has been renamed to Paint Buffer toolbar and contains another tool that resets the transformation of the paint buffer. For more information on the Paint Buffer toolbar, see Toolbars. Choosing a Paint Target In Mari 3.3, the Paint Target quick palette (hold the I key) allows you to select your objects, shaders, channels, and layers. In Mari 4.0, the Paint Target quick palette (hold the I key) allows you to. Toolbar Paint is specifically targeted at developers who wish to design their own toolbar button graphics. It can open toolbar bitmaps with up to 64 buttons and allows you to visually design a toolbar using a wide selection of editing tools. Addition toolbar, paint, toolbar paint, paint toolbar paint, toolbar paint toolbar, - Image Editors - Multimedia Graphics Toolbar Paint - Free It can open toolbar bitmaps with up to 64 buttons and allows you to visually design a toolbar using a wide selection of editing tools. Addition toolbar, paint, toolbar paint, paint toolbar paint, toolbar paint toolbar, - Image Editors - Multimedia Graphics Toolbar Paint - Free Software Download Toolbar Paint is specifically targeted at developers who wish to design their own toolbar button graphics. It can open toolbar bitmaps with up to 64 buttons and allows you to visually design a toolbar using a wide selection of editing tools. Addition toolbar, paint, toolbar paint, paint toolbar paint, toolbar paint toolbar, - Image Editors Download Toolbar Paint 1. Download Toolbar Paint 1. Authors software. Toolbar Paint 1. Donkey Toolbar Paint was specifically thought for developers who want to design their own toolbar button graphics. ดาวน์โหลดอัปเดตล่าสุดของ Toolbar Paint สำหรับ Windows. เวอร์ชันใหม่ของ Toolbar Paint 1. แบบฟรีพร้อมแล้ว Mari's UI has been redesigned for better usability. Below is a list briefly describing the changes. Click on the links for more details. Creating a Project • New Project dialog - The New Project dialog has been redesigned and now includes shading and lighting modes. Controlling the Project • The Selection, Default Shaders, Lighting, and Mirroring toolbars have been removed in 4.0. They have been added to the new Project Controls toolbar. Using Tools • All of Mari’s tools are now grouped into categories, in the Tools toolbar, to reduce the space they use in the UI. • The Tool Properties toolbars have been redesigned. They now include a brush splat icon and fewer button labels. • The Ptex and Vector Painting toolbars are hidden in the default layout. They can be made visible using the toolbar right-click menu. Painting in Mari • The Painting toolbar has been renamed to the Paint Buffer toolbar. An additional button for resetting the translation of the paint buffer has been added to the toolbar. • The Projection palette has been merged with the Painting palette. • You can now access all Mari’s palettes through the new Palettes toolbar. • The Paint Target quick palette has been extended to include the paint target when a mask is present. • The Layers palette is now more intuitive when working with Group layers. Editing Brushes • The Brush Editor palette has been removed. The Brush Properties are now accessible through the Tool Properties palette. Instead ofComments
Toolbars contain too many text labels making them too long to display on one line. In Mari 4.0, the tool's Tool Properties toolbars have been revisited. Icons have replaced text labels, dropdowns have been replaced with checkboxes, a brush splat is used for all painting tools, and so on. For more information on the Tool Properties toolbar, see Toolbars. Ptex and Vector Painting Toolbars In Mari 3.0, both Ptex and Vector Painting toolbars are displayed in Mari default layout. In Mari 4.0, both Ptex and Vector Painting toolbars are hidden by default. You can access them through the toolbar's right-click menu. See Toolbars. Painting in Mari In Mari 3.3, the Blending modes display in a long dropdown menu taking a lot of space and making it hard to see what Blending mode to use. In Mari 4.0, Blending modes have been categorized making them easier to navigate to in the dropdown menu. See Paint Blending Modes. Using the Paint Buffer In Mari 3.3, the Painting toolbar only contains one tool that clears unbaked paint. In Mari 4.0, the Painting toolbar has been renamed to Paint Buffer toolbar and contains another tool that resets the transformation of the paint buffer. For more information on the Paint Buffer toolbar, see Toolbars. Choosing a Paint Target In Mari 3.3, the Paint Target quick palette (hold the I key) allows you to select your objects, shaders, channels, and layers. In Mari 4.0, the Paint Target quick palette (hold the I key) allows you to
2025-04-16Mari's UI has been redesigned for better usability. Below is a list briefly describing the changes. Click on the links for more details. Creating a Project • New Project dialog - The New Project dialog has been redesigned and now includes shading and lighting modes. Controlling the Project • The Selection, Default Shaders, Lighting, and Mirroring toolbars have been removed in 4.0. They have been added to the new Project Controls toolbar. Using Tools • All of Mari’s tools are now grouped into categories, in the Tools toolbar, to reduce the space they use in the UI. • The Tool Properties toolbars have been redesigned. They now include a brush splat icon and fewer button labels. • The Ptex and Vector Painting toolbars are hidden in the default layout. They can be made visible using the toolbar right-click menu. Painting in Mari • The Painting toolbar has been renamed to the Paint Buffer toolbar. An additional button for resetting the translation of the paint buffer has been added to the toolbar. • The Projection palette has been merged with the Painting palette. • You can now access all Mari’s palettes through the new Palettes toolbar. • The Paint Target quick palette has been extended to include the paint target when a mask is present. • The Layers palette is now more intuitive when working with Group layers. Editing Brushes • The Brush Editor palette has been removed. The Brush Properties are now accessible through the Tool Properties palette. Instead of
2025-04-13Has also introduced the concept of a current User Shader. Selecting this option in the dropdown menu uses the last selected User Shader as the current shader in the canvas. Additionally, Mari now saves the lighting mode used alongside certain shaders. User Shader and Current Paint Target have separate saved lighting modes, while the Current Channel, Current Layer and Current Layer & Below system shaders share a saved lighting mode. This means you have the option to always view your channel components with flat lighting, while having full lighting with shadows automatically changed when switching to a User Shader. See Toolbars. Tools Toolbar In Mari 3.3, the Tools toolbar is spread out and depending on your screen vertical height resolution, you need to click the double arrow icon to display all the toolbar buttons. In Mari 4.0, apart from the eye dropper and color controls, the tools have been grouped by category to make room for other toolbars. You can now find the following tool categories: • Objects tools • Painting tools • Image Painting tools • Paint Transformation tools • Paint Buffer tools The icon changes to the selected tool. You can also use keyboard shortcuts to switch to any tool. Click and hold any tool group button to access a menu of tools in the group. Ctrl+click a tool group button to cycle through the tools in the group. For more information on the Tools toolbar, see Toolbars. Tool Properties Toolbar In Mari 3.3, the tool's Tool Properties
2025-03-28