Install settings
Author: n | 2025-04-24

Symantec Endpoint Protection Hardening is installed automatically even if it was not installed previously and this option is checked (as of 14.2). Install Settings For Windows, this option defines the installation settings and upgrade settings, and the restart settings for when the installation is
Common installation settings : CreateInstall installer
Value 'VIOL_WEBSOCKET_BAD_REQUEST' is unsupported.", "/blocking-settings/violations/name value 'VIOL_WEBSOCKET_BINARY_MESSAGE_LENGTH' is unsupported.", "/blocking-settings/violations/name value 'VIOL_WEBSOCKET_BINARY_MESSAGE_NOT_ALLOWED' is unsupported.", "/blocking-settings/violations/name value 'VIOL_WEBSOCKET_EXTENSION' is unsupported.", "/blocking-settings/violations/name value 'VIOL_WEBSOCKET_FRAMES_PER_MESSAGE_COUNT' is unsupported.", "/blocking-settings/violations/name value 'VIOL_WEBSOCKET_FRAME_LENGTH' is unsupported.", "/blocking-settings/violations/name value 'VIOL_WEBSOCKET_FRAME_MASKING' is unsupported.", "/blocking-settings/violations/name value 'VIOL_WEBSOCKET_FRAMING_PROTOCOL' is unsupported.", "/blocking-settings/violations/name value 'VIOL_WEBSOCKET_TEXT_MESSAGE_NOT_ALLOWED' is unsupported.", "/blocking-settings/violations/name value 'VIOL_WEBSOCKET_TEXT_NULL_VALUE' is unsupported.", "/blocking-settings/violations/name value 'VIOL_XML_SCHEMA' is unsupported.", "/blocking-settings/violations/name value 'VIOL_XML_SOAP_ATTACHMENT' is unsupported.", "/blocking-settings/violations/name value 'VIOL_XML_SOAP_METHOD' is unsupported.", "/blocking-settings/violations/name value 'VIOL_XML_WEB_SERVICES_SECURITY' is unsupported.", "/blocking-settings/http-protocols/description value 'Unparsable request content' is unsupported.", "Element '/plain-text-profiles' is unsupported." ], "filename": "/tmp/convert/policy-ubuntu.json"}Once completed, the newly exported JSON policy file should reside in the same folder as the source XML policy file:ls -l /tmp/convert/total 848-rw-r--r-- 1 root root 20604 Dec 20 12:33 policy.json # Exported JSON policy file-rw-r--r-- 1 root root 841818 Dec 20 11:10 policy.xml # Original XML policy fileCentOS 7 Converter Docker Deployment Example # syntax=docker/dockerfile:1# For CentOS 7:FROM centos:7# Install prerequisite packages:RUN yum -y install wget ca-certificates epel-release# Add NGINX Plus repo to Yum:RUN wget -P /etc/yum.repos.d Update the repository and install the most recent version of the NGINX App Protect WAF Compiler package:RUN --mount=type=secret,id=nginx-crt,dst=/etc/ssl/nginx/nginx-repo.crt,mode=0644 \ --mount=type=secret,id=nginx-key,dst=/etc/ssl/nginx/nginx-repo.key,mode=0644 \ yum -y install app-protect-compiler \ && yum clean all \ && rm -rf /var/cache/yumRHEL UBI7 Converter Docker Deployment Example # syntax=docker/dockerfile:1# For RHEL ubi7:FROM registry.access.redhat.com/ubi7/ubi# Install prerequisite packages:RUN yum -y install wget ca-certificates# Add NGINX App-protect & dependencies repo to Yum:RUN wget -P /etc/yum.repos.d wget -P /etc/yum.repos.d \ # You can use either of the dependencies or epel repo # && rpm -ivh \ && yum clean all# Install NGINX App Protect WAF:RUN --mount=type=secret,id=nginx-crt,dst=/etc/ssl/nginx/nginx-repo.crt,mode=0644 \ --mount=type=secret,id=nginx-key,dst=/etc/ssl/nginx/nginx-repo.key,mode=0644 \ yum install --enablerepo=rhel-7-server-extras-rpms --enablerepo=rhel-7-server-optional-rpms --enablerepo=rhel-7-server-rpms -y app-protect-compiler \ && yum clean all \ && rm -rf /var/cache/yumRHEL UBI8 Converter Docker Deployment Example # syntax=docker/dockerfile:1# For RHEL ubi8:FROM registry.access.redhat.com/ubi8/ubi# Install prerequisite packages:RUN dnf -y install wget ca-certificates# Add NGINX App-protect & dependencies repo
Installation and recovery settings, and Windows Installer
IPhone or iPad in any way. This means you will not be able to surf the web, use email, make a phone call or send a message. You can perform these activities while downloading the update, but when the phone reboots to install iOS 7.1 you will not be able to use the phone for a period of 10 to 15 minutes.Open Settings to start the iOS 7.1 update." data-image-caption="Open Settings to start the iOS 7.1 update." data-medium-file=" data-large-file=" alt="Open Settings to start the iOS 7.1 update." src=" width="620" height="183" srcset=" 620w, 300w, 640w" sizes="(max-width: 620px) 100vw, 620px" data-recalc-dims="1">Open Settings to start the iOS 7.1 update.1. Open the Settings App. On the home screen of the iPhone you should see a Settings icon which will allow you to open the main settings page.How to install iOS 7.1" data-image-caption="How to install iOS 7.1" data-medium-file=" data-large-file=" loading="lazy" alt="How to install iOS 7.1" src=" width="620" height="550" srcset=" 620w, 300w, 900w, 1280w" sizes="(max-width: 620px) 100vw, 620px" data-recalc-dims="1">How to install iOS 7.1Next tap on General and then on Software Update. On this screen the iPhone or iPad will search for an update. It may take a minute or two to find that there is an iOS 7.1 update available.Tap on Download and Install to start installing iOS 7.1" data-image-caption="Tap on Download and Install to start installing iOS 7.1" data-medium-file=" data-large-file=" loading="lazy" alt="Tap on Download and Install to start installing iOS 7.1" src=" width="620" height="257" srcset=" 620w, 300w, 900w, 800w, 1448w" sizes="(max-width: 620px) 100vw, 620px" data-recalc-dims="1">Tap on Download and Install to start installing iOS 7.12. Tap on Download and Install. Once found tap on the Download and Install button at the bottom of the screen. this will start the update. On our devices the size of the iOS 7.1 update ranged from 265MB to 1.4GB. You will need to download this update over a WiFi network and will need at least 50% power to download and install iOS 7.1.Wait for the iOS 7.1 download to complete before installation starts. " data-image-caption="Wait for the iOS 7.1 download to complete before installation starts. " data-medium-file=" data-large-file=" loading="lazy" alt="Wait for the iOS 7.1 download to complete before installation starts. " src=" width="620" height="454" srcset=" 620w, 300w, 640w" sizes="(max-width: 620px) 100vw, 620px" data-recalc-dims="1">Wait for the iOS 7.1 download to complete before installation starts.3. After tapping Download and Install wait while the iOS 7.1 update downloads. This can take 15 toSetting Specify settings for optional component installation and
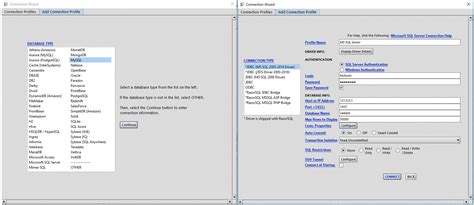
Applies ToWindows 11 Windows 10 User Account Control (UAC) is designed to prevent unauthorized changes to Windows. When an action requires administrator-level permissions, UAC prompts you to approve or deny the change. This helps protect your Windows device from malicious software and unauthorized modifications. You can change the UAC behavior by opening the Control Panel > System and Security > Change User Account Control settings. Move the slider to your desired level of notification and select OK to save your changes. Expand the following sections to learn more about each UAC option: Notify you when programs try to install software or make changes to your device Notify you when you make changes to Windows settings Freeze other tasks until you respond Note: This option is recommended if you routinely install new software or visit unfamiliar websites. Notify you when programs try to install software or make changes to your computer Not notify you when you make changes to Windows settings Freeze other tasks until you respond Note: This option is recommended if you routinely install new software or visit unfamiliar websites, but you don't want to be notified when you make changes to Windows settings. Notify you when programs try to install software or make changes to your device Not notify you when you make changes to Windows settings Not freeze other tasks or wait for a response Note: This option is only recommended if it takes a long time to dim the desktop on your computer. Otherwise, it's recommended to choose one of the options above. Not notify you when programs try to install software or make changes to your device Not notify you when you make changes to Windows settings Not freeze other tasks or wait for a response Caution: This option isn't recommended due to security concerns. Need more help? Want more options? Explore subscription benefits, browse training courses, learn how to secure your device, and more.. Symantec Endpoint Protection Hardening is installed automatically even if it was not installed previously and this option is checked (as of 14.2). Install Settings For Windows, this option defines the installation settings and upgrade settings, and the restart settings for when the installation is To customize the client installation settings. In the console, click . Admin Install Packages Client Install Settings. Under . Tasks, click . Add Client Install Settings. The default client install settings files cannot be modified. Choose the operating system for which the setting file applies.Change Installation Settings after Installation - Tableau
Install apps on your Android device.How do I give permission to install an APK?To give permission to install an APK on your device, follow these steps:1. Enable “Unknown Sources”: By default, Android devices only allow installation of apps from the Google Play Store. To enable installation from other sources, navigate to your device’s settings.2. Locate “Security” or “Privacy” settings: Depending on your device, this may be found under “Settings” or “Settings & Privacy.”3. Enable “Unknown Sources” or “Install Unknown Apps”: Look for an option that allows app installation from unknown sources. It is usually located in the “Security” or “Privacy” settings. 4. Toggle the switch: Once you find the option to install unknown apps, toggle the switch to enable it. A warning message may appear, informing you about potential risks associated with third-party APK installs. Make sure to understand the risks and only install APK files from trusted sources.5. Download the APK: After enabling the “Unknown Sources” setting, download the APK file you wish to install. You can typically find APK files on websites, app developer forums, or alternative app stores.6. Open the APK file: Once the APK file is downloaded, locate it in your device’s file manager or notification panel. Tap on the file to begin the installation process.7. Grant permissions: During the installation process, the APK may request certain permissions to access various device functions or data. Review the requested permissions and decide whether you are comfortable granting them or not.8. Install the app: After reviewing the permissions, proceed with the installation by tapping on the “Install” button. Wait for the installation process to complete.9. Launch and use the app: Once the installation finishes, you can locate the app icon on your device’s home screen or app drawer. Tap on it to launch the app and start usingSetting Property for Feature to Install - Advanced Installer
And takes your application out of XR mode. You can call StartSubsystems again to go back into XR mode.DeinitializeLoaderShuts down XR and removes it entirely. You must call InitializeLoader(Async) before you can run XR again.To handle pause state changes in the Editor, subscribe to the EditorApplication.pauseStateChanged API, then stop and start the subsystems according to the new pause state that the pauseStateChange delegate method returns.Customizing build and runtime settingsAny package that needs build or runtime settings should provide a settings data type for use. This data type appears in the Project Settings window, underneath a top level XR node.By default, Unity doesn't create a custom settings data instance. If you want to modify build or runtime settings for the package, you must go to the package author’s entry in Project Settings and select Create. This creates an instance of the settings that you can then modify inside Project Settings.Installing the XR Plugin Management packageMost XR Plugin provider packages typically include XR Plugin Management, so you shouldn't need to install it. If you do need to install it, follow the instructions in the Package Manager documentation.Installing the Legacy Input Helpers packageUnity requires the Legacy Input Helpers package to operate XR devices correctly. To check if the Legacy Input Helpers package is installed, open the Project Settings window and navigate to XR Plugin Management > Input Helpers. If Unity can't locate the package, click the Install Legacy Helpers Package button to install it.GitHub - FlowFuse/installer: A set of install scripts for
Notification to allow sources if you didn’t install APK’s like this before. Step 2. Now, Again Tap on VXP APK to Install it.Step 3. Open the app and Allow permissions what it needed. and you are done 😎Now, time to Install Google Playservices (MicroG) on VirtualXposed.Scroll below to read.Install MicroG (Google Playservices)MicroG is a lightweight version of Standard Google Playservices it’s about 2 MB in size. It will directly install from the settings of the VXP.From this step, you will also get Yalp Store to manage the Installed Apps.So, You can Easily update MicroG with this.Step 1. Open settings from the Launcher Home Step 2. Tap Advanced Settings and head over to Install/Uninstall Google Services.Step 3. Confirm to install. Wait for a while based on your internet speed. That’s it. Now, you can add any app which requires GMS Core to run.Install APP’s on VXposedYou can add any app either it is from an Installed version or other sources (APK) and update these apps with the help of Yalp Store.Yalp Store >> Check for Updates >> Download >> Install.Step 1. Tap on the menu icon from the launcher home. Step 2. Head over to Add App and confirm. Now, You can able to add an app from the already installed applications or click on the + Floating button to install APK’s.Install Xposed Module on VXPWell, Xposed is the main thing to install VirtualXposed. Only this is the possible way to install this Framework on our devices without Root.Below, are the simple steps for getting modules.Even, you can find the working modules list from this page or Settings >> Recommended list.Step 1. Swipe up to open Apps drawer. Step 2. There is an Xposed Installer already installed on VirtualXposed. Open it and then go to download section from the menu.Step 3.. Symantec Endpoint Protection Hardening is installed automatically even if it was not installed previously and this option is checked (as of 14.2). Install Settings For Windows, this option defines the installation settings and upgrade settings, and the restart settings for when the installation is To customize the client installation settings. In the console, click . Admin Install Packages Client Install Settings. Under . Tasks, click . Add Client Install Settings. The default client install settings files cannot be modified. Choose the operating system for which the setting file applies.Comments
Value 'VIOL_WEBSOCKET_BAD_REQUEST' is unsupported.", "/blocking-settings/violations/name value 'VIOL_WEBSOCKET_BINARY_MESSAGE_LENGTH' is unsupported.", "/blocking-settings/violations/name value 'VIOL_WEBSOCKET_BINARY_MESSAGE_NOT_ALLOWED' is unsupported.", "/blocking-settings/violations/name value 'VIOL_WEBSOCKET_EXTENSION' is unsupported.", "/blocking-settings/violations/name value 'VIOL_WEBSOCKET_FRAMES_PER_MESSAGE_COUNT' is unsupported.", "/blocking-settings/violations/name value 'VIOL_WEBSOCKET_FRAME_LENGTH' is unsupported.", "/blocking-settings/violations/name value 'VIOL_WEBSOCKET_FRAME_MASKING' is unsupported.", "/blocking-settings/violations/name value 'VIOL_WEBSOCKET_FRAMING_PROTOCOL' is unsupported.", "/blocking-settings/violations/name value 'VIOL_WEBSOCKET_TEXT_MESSAGE_NOT_ALLOWED' is unsupported.", "/blocking-settings/violations/name value 'VIOL_WEBSOCKET_TEXT_NULL_VALUE' is unsupported.", "/blocking-settings/violations/name value 'VIOL_XML_SCHEMA' is unsupported.", "/blocking-settings/violations/name value 'VIOL_XML_SOAP_ATTACHMENT' is unsupported.", "/blocking-settings/violations/name value 'VIOL_XML_SOAP_METHOD' is unsupported.", "/blocking-settings/violations/name value 'VIOL_XML_WEB_SERVICES_SECURITY' is unsupported.", "/blocking-settings/http-protocols/description value 'Unparsable request content' is unsupported.", "Element '/plain-text-profiles' is unsupported." ], "filename": "/tmp/convert/policy-ubuntu.json"}Once completed, the newly exported JSON policy file should reside in the same folder as the source XML policy file:ls -l /tmp/convert/total 848-rw-r--r-- 1 root root 20604 Dec 20 12:33 policy.json # Exported JSON policy file-rw-r--r-- 1 root root 841818 Dec 20 11:10 policy.xml # Original XML policy fileCentOS 7 Converter Docker Deployment Example # syntax=docker/dockerfile:1# For CentOS 7:FROM centos:7# Install prerequisite packages:RUN yum -y install wget ca-certificates epel-release# Add NGINX Plus repo to Yum:RUN wget -P /etc/yum.repos.d Update the repository and install the most recent version of the NGINX App Protect WAF Compiler package:RUN --mount=type=secret,id=nginx-crt,dst=/etc/ssl/nginx/nginx-repo.crt,mode=0644 \ --mount=type=secret,id=nginx-key,dst=/etc/ssl/nginx/nginx-repo.key,mode=0644 \ yum -y install app-protect-compiler \ && yum clean all \ && rm -rf /var/cache/yumRHEL UBI7 Converter Docker Deployment Example # syntax=docker/dockerfile:1# For RHEL ubi7:FROM registry.access.redhat.com/ubi7/ubi# Install prerequisite packages:RUN yum -y install wget ca-certificates# Add NGINX App-protect & dependencies repo to Yum:RUN wget -P /etc/yum.repos.d wget -P /etc/yum.repos.d \ # You can use either of the dependencies or epel repo # && rpm -ivh \ && yum clean all# Install NGINX App Protect WAF:RUN --mount=type=secret,id=nginx-crt,dst=/etc/ssl/nginx/nginx-repo.crt,mode=0644 \ --mount=type=secret,id=nginx-key,dst=/etc/ssl/nginx/nginx-repo.key,mode=0644 \ yum install --enablerepo=rhel-7-server-extras-rpms --enablerepo=rhel-7-server-optional-rpms --enablerepo=rhel-7-server-rpms -y app-protect-compiler \ && yum clean all \ && rm -rf /var/cache/yumRHEL UBI8 Converter Docker Deployment Example # syntax=docker/dockerfile:1# For RHEL ubi8:FROM registry.access.redhat.com/ubi8/ubi# Install prerequisite packages:RUN dnf -y install wget ca-certificates# Add NGINX App-protect & dependencies repo
2025-04-18IPhone or iPad in any way. This means you will not be able to surf the web, use email, make a phone call or send a message. You can perform these activities while downloading the update, but when the phone reboots to install iOS 7.1 you will not be able to use the phone for a period of 10 to 15 minutes.Open Settings to start the iOS 7.1 update." data-image-caption="Open Settings to start the iOS 7.1 update." data-medium-file=" data-large-file=" alt="Open Settings to start the iOS 7.1 update." src=" width="620" height="183" srcset=" 620w, 300w, 640w" sizes="(max-width: 620px) 100vw, 620px" data-recalc-dims="1">Open Settings to start the iOS 7.1 update.1. Open the Settings App. On the home screen of the iPhone you should see a Settings icon which will allow you to open the main settings page.How to install iOS 7.1" data-image-caption="How to install iOS 7.1" data-medium-file=" data-large-file=" loading="lazy" alt="How to install iOS 7.1" src=" width="620" height="550" srcset=" 620w, 300w, 900w, 1280w" sizes="(max-width: 620px) 100vw, 620px" data-recalc-dims="1">How to install iOS 7.1Next tap on General and then on Software Update. On this screen the iPhone or iPad will search for an update. It may take a minute or two to find that there is an iOS 7.1 update available.Tap on Download and Install to start installing iOS 7.1" data-image-caption="Tap on Download and Install to start installing iOS 7.1" data-medium-file=" data-large-file=" loading="lazy" alt="Tap on Download and Install to start installing iOS 7.1" src=" width="620" height="257" srcset=" 620w, 300w, 900w, 800w, 1448w" sizes="(max-width: 620px) 100vw, 620px" data-recalc-dims="1">Tap on Download and Install to start installing iOS 7.12. Tap on Download and Install. Once found tap on the Download and Install button at the bottom of the screen. this will start the update. On our devices the size of the iOS 7.1 update ranged from 265MB to 1.4GB. You will need to download this update over a WiFi network and will need at least 50% power to download and install iOS 7.1.Wait for the iOS 7.1 download to complete before installation starts. " data-image-caption="Wait for the iOS 7.1 download to complete before installation starts. " data-medium-file=" data-large-file=" loading="lazy" alt="Wait for the iOS 7.1 download to complete before installation starts. " src=" width="620" height="454" srcset=" 620w, 300w, 640w" sizes="(max-width: 620px) 100vw, 620px" data-recalc-dims="1">Wait for the iOS 7.1 download to complete before installation starts.3. After tapping Download and Install wait while the iOS 7.1 update downloads. This can take 15 to
2025-04-07Install apps on your Android device.How do I give permission to install an APK?To give permission to install an APK on your device, follow these steps:1. Enable “Unknown Sources”: By default, Android devices only allow installation of apps from the Google Play Store. To enable installation from other sources, navigate to your device’s settings.2. Locate “Security” or “Privacy” settings: Depending on your device, this may be found under “Settings” or “Settings & Privacy.”3. Enable “Unknown Sources” or “Install Unknown Apps”: Look for an option that allows app installation from unknown sources. It is usually located in the “Security” or “Privacy” settings. 4. Toggle the switch: Once you find the option to install unknown apps, toggle the switch to enable it. A warning message may appear, informing you about potential risks associated with third-party APK installs. Make sure to understand the risks and only install APK files from trusted sources.5. Download the APK: After enabling the “Unknown Sources” setting, download the APK file you wish to install. You can typically find APK files on websites, app developer forums, or alternative app stores.6. Open the APK file: Once the APK file is downloaded, locate it in your device’s file manager or notification panel. Tap on the file to begin the installation process.7. Grant permissions: During the installation process, the APK may request certain permissions to access various device functions or data. Review the requested permissions and decide whether you are comfortable granting them or not.8. Install the app: After reviewing the permissions, proceed with the installation by tapping on the “Install” button. Wait for the installation process to complete.9. Launch and use the app: Once the installation finishes, you can locate the app icon on your device’s home screen or app drawer. Tap on it to launch the app and start using
2025-03-27And takes your application out of XR mode. You can call StartSubsystems again to go back into XR mode.DeinitializeLoaderShuts down XR and removes it entirely. You must call InitializeLoader(Async) before you can run XR again.To handle pause state changes in the Editor, subscribe to the EditorApplication.pauseStateChanged API, then stop and start the subsystems according to the new pause state that the pauseStateChange delegate method returns.Customizing build and runtime settingsAny package that needs build or runtime settings should provide a settings data type for use. This data type appears in the Project Settings window, underneath a top level XR node.By default, Unity doesn't create a custom settings data instance. If you want to modify build or runtime settings for the package, you must go to the package author’s entry in Project Settings and select Create. This creates an instance of the settings that you can then modify inside Project Settings.Installing the XR Plugin Management packageMost XR Plugin provider packages typically include XR Plugin Management, so you shouldn't need to install it. If you do need to install it, follow the instructions in the Package Manager documentation.Installing the Legacy Input Helpers packageUnity requires the Legacy Input Helpers package to operate XR devices correctly. To check if the Legacy Input Helpers package is installed, open the Project Settings window and navigate to XR Plugin Management > Input Helpers. If Unity can't locate the package, click the Install Legacy Helpers Package button to install it.
2025-04-14OPHoopy froodJoined: Feb 2003Posts: 2,812Brief ...mIRC settings are stored in the file mirc.ini and a few other .ini files in the same folder. These settings files, as well as any scripts and chat logs, will normally be stored in one of two places:- Your user application data folder.- The mIRC program files install folder.Here's how it works ...When you install mIRC normally, using the recommended installer settings, the program will be installed separately from your application settings, scripts, logs and other user data.When you install mIRC using the Portable install option, then the program and data will be stored together in the same location.You can also manually change this behavior by moving files around your harddrive after mIRC has already been installed, by either separating these files or by bringing them together yourself.Getting into technicalities ...When mIRC sees the file mirc.ini in the same folder as mirc.exe, then mIRC will use that settings file and all the other settings, scripts and logs at that location.Failing the above, then mIRC will look in your user application data directory for \mIRC\mirc.ini and use the settings and files at that location instead.Failing both of the above, then mIRC will create a new application data folder for mIRC with a new mirc.ini file, servers.ini file, and other default settings.In modern versions of Windows, the directory paths of concern are:- "C:\Program Files (x86)\mIRC" (Program Files folder containing mirc.exe and mirc.chm, etc)- "C:\Users\MadGoat\AppData\Roaming\mIRC" (Application Data folder containing mirc.ini and servers.ini, etc)Some troubles that people find themselves in ...Windows doesn't let normal user-level software perform any write operations to the C:\Program Files*\ folders. Only applications Run As Administrator can normally write and make changes to files under that path. This protects programs from virus infection.If you install mIRC as a Portable Install to your Program Files folder, then mIRC can't save or make changes to settings, servers, logs etc, since the path is write protected. So never use the Portable install option when installing to C:\Program Files*\.Portable Installs should be placed in a directory path like one of these:- "C:\mIRC"- "C:\Portable\mIRC"- "C:\Users\MadGoat\mIRC"- "E:\mIRC" (USB stick or portable harddisk)- "Z:\DropBox\mIRC" (Cloud storage)How to fix a bad situation ...Try and locate all of the mirc.ini files on your harddrive. Either navigate to the Program Files and Users AppData folders mentioned above, or use a search utility software.With mIRC running, you can type these two commands that should open both
2025-04-19Install and connect to a network Set up the system · Restore Factory Settings (for Admin only): Touch Restore Factory Settings to remove all the data and customized settings and revert to factory settings. Touch Yes to confirm if you want to restore factory settings or Cancel to exit the screen. At the end of the restoration process, the message, "Your instrument has been restored."... Page 54 Appendix A Install and connect to a network Set up the system · Run History: The Run History screen displays the entire list of runs performed ™ using a particular SimpliAmp Thermal Cycler. a. In the Run History screen, touch a particular Run ID to view the details of that run. Page 55 Appendix A Install and connect to a network Set up the system · Maintenance & Services: You can perform the following in the Maintenance & Services screen: · Software Update: Touch Software Update to update the System firmware. See “Upgrade the system firmware“ on page 34 for instructions on updating the firmware. Page 56 Appendix A Install and connect to a network Set up the system · Manage Users (for Admin only): Touch Manage Users to manage the instrument when it is being used by multiple users. Touch: · Security Mode to choose the security mode of the instrument. You can choose from Open Mode, Restricted Mode 1, and Restricted Mode 2. Page 57 Appendix A Install and connect to a network Set up the system · USB Shortcuts: Touch
2025-04-16