Clip box
Author: t | 2025-04-24
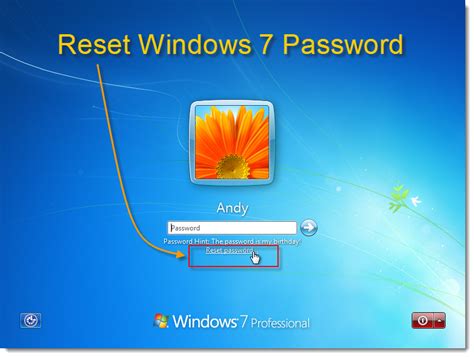
Step 8b: For metal boxes, press down on the Box Doctor clip and then slide the clip to the right or left locking the clip onto the damaged box. Depending on the box, slide to the Show/Hide the Clip box. Shows or hides the Clip box of the selected object. Reset. Resets the Clip box of the selected object. NOTE Multiple Clip boxes are be reset together by selecting multiple objects in the Data Properties and
Clip Box - doc.comsol.com
Box button in the floating toolbar to add it to the list of saved ClipsAdjust X Axis - Set the active editing axis to the X axisAdjust Y Axis - Set the active editing axis to the Y axisAdjust Z Axis - Set the active editing axis to the Z axisClear Clip Box - Delete the the Clip Box that is being edited and close the editing session2. Clip Box adjustmentThe Clip Box adjustment control on the right-hand side of the viewing window can be used to adjust the extents and location of Clip Box along the selected axis. The buttons on the top and bottom of the slider control can be used to adjust the edges of the Clip Box. The button in the middle of the slider control can be used to adjust the location of the Clip Box. Optionally, you can manually type values into the text boxes next to each of these controls. The values should be in the same unit as the coordinate system being used.3. Clip Box RotationThe Clip Box rotation control at the top of the viewing window can be used to rotate the Clip Box along the selected axis. Moving the control to the left will rotate the Clip Box counter clockwise. Moving the control to the right will rotate the Clip Box clockwise. Optionally, you can manually type a value into the text box next to the rotation controls. The value should be between 0 and 360 degrees.Smart AlignThe Smart Align
Amazon.co.uk: Clip Boxes
You are here: Clipart Download » Check Mark Clipart For Powerpoint Clip Art Of Check - Red Check Mark In Box Check Mark Clipart For Powerpoint Clip Art Of Check - Red Check Mark In Box is one of the clipart about check mark clipart black and white,red check mark clip art,clip art check box. This clipart image is transparent backgroud and PNG format. You can download (1569x1709) Check Mark Clipart For Powerpoint Clip Art Of Check - Red Check Mark In Box png clip art for free. It's high quality and easy to use. Also, find more png clipart about check mark clip art free,box clipart,nature clipart. Please remember to share it with your friends if you like. If you find any inappropriate image content on ClipartMax.com, please contact us and we will take appropriate action. You're welcome to embed this image in your website/blog! Small size image for your website/blog: Medium size image for your website/blog: Views: 39 Downloads: 15 Resolution: 1569x1709 Name:Check Mark Clipart For Powerpoint Clip Art Of Check - Red Check Mark In Box License:Personal Use File Format:PNG PNG Size:112 KB This Free Clip Arts Design Of Bright Green Check Mark - Powerpoint Green Check Mark 600*532 26 12 Follow Up Post-event - Check Mark For Powerpoint Orange 656*656 8 2 Check Mark Clipart For Powerpoint Clip Art Of Check - Red Check Mark In Box 1569*1709 16 6 19 Check In Graphic Library Huge Freebie Download For - Check Mark Box Png 2400*2224 2 1 Red Check Mark Over Black Box - Box With Check Mark 2000*2493 14 6 Check Box Icon Tick Mark Correct Choice Ch - Check Mark In Box Icon 366*340 20 9 Photography Checklist - Green Check Mark In Box 512*512 32 18 Blue Checkmark With Box Svg Clip Arts 588 X 599 Px - Check Mark With Box 600*594 8 1 Check Mark Checkmark Clip Art At Vector Clip Art Clipartcow - Green Check Mark Box 2400*2400 13 4 Free Vector Green Check Box With Check Mark - Green Check Mark Box Png 384*332 12 5 Question Mark Check Box 600*600 5 1 Open - Purple Check Mark Box 2000*2000 6 1 Results - Check Mark In Box Clip Art 1280*1280 5 2 Check Mark In Box Icon 1024*949 4 1 Apply - Check Mark Box Png 512*512 8 3 Pros - Box With Check Mark 420*420 5 1Box Clip Art - Box Image - MyCuteGraphics
The camera's position beyond which framing objects are clipped. *Applies to Chief Architect X15, Home Designer 2024, and newer versions. Check Back Clip to include only the objects or portions of objects located between the start and end points of the camera's Line of Sight in the view. When checked, you can specify the Back Clip After distance, which is the distance from the camera's position beyond which objects other than framing are clipped. It is also the length of the camera's Line of Sight from the cross section line at its start to the back clip line at its end. This text field reports the length of the camera's Line of Sight even when the setting is unchecked. This box is checked by default for backclipped cross section views. In this example, we have checked the Back Clip box and specified a Back Clip After value of 400". Check Clip Sides to limit the selected view’s side-to-side extents. When checked, you can specify a Clip Width value and/or use the newly displayed edit handles at each end of the cross section line to adjust the view. When unchecked, the full width of the model is included in the view. Check the Clip Elevation box, then specify values for the Bottom Clip Elevation and Top Clip Elevation fields. When unchecked, the full height of the model is included in the view. The display of the foundation floor level can also be controlled using layers. To learn more, please see the "Turning Off the Display of the Foundation in a Cross Section/Elevation View" resource located in the Related Articles section. A Clip to Room setting is also available. When checked, the extents of the current view will be confined to the room that the camera is located in and framing objects will not be visible. The view's clip values are reported above for reference, but will be grayed out. This box is checked by default for Wall Elevation views and is only available if the camera is located inside of a room. When this setting is checked or a Wall Elevation. Step 8b: For metal boxes, press down on the Box Doctor clip and then slide the clip to the right or left locking the clip onto the damaged box. Depending on the box, slide to theAcco Brand Binder Clips, Large, 1 Box, 12 Clips/Box ( )
Error message. Color GeoTags by CategoryGeoTags can be rendered by category by selecting the Color GeoTag by Category button.The Color Geotag by Color dialog contains two options for rendering GeoTags. By default the Color by Category option is turned off. This disables the Category table control. The GeoTag Color control at the bottom of the dialog will be active. This control can be used to render all GeoTags as the same color. Click on the color control to open the color picker and choose a color.Truning on the Color by Category option will activate the category table control. This will display each GeoTag category in a list with a color picker for each category. GeoTag categories can be added to individual GeoTags by opening the GeoTag properties for each GeoTag in the GeoTag panel and adding a value to the Category field. GeoTags that do not have a category associated with them will be labelled as in the GeoTag symbology dialog.Touch Friendly Clip box Creation ToolsThe Clip Box creation tools have been modified so that they can be used on touch screen devices. They can be invoked the same way as in previous versions. The old controls can still be used if you prefer using them.Once a Clip Box is created, several controls will open that can be used to manipulate the clip box with a mouse or on a touch screen.1. Primary toolbarAccept Clip Box - When you are finished editing the Clip Box, click on the Accept ClipACCO Paper Clips, Jumbo, Smooth, 100 Clips/Box, 1 Box
As the User Library.Devices in the Audio Effects label are now grouped into folders. As with other folders in the browser, it is possible to unfold more than one folder at once, by holding "Cmd" (Mac) / "Ctrl" (Win).Ableton’s official Max for Live devices are now listed within the "Audio Effects", "MIDI Effects", and "Instruments" labels. The nodes can be expanded to reveal presets (.adv files) organized in virtual folders, if any exist. Presets outside of matching virtual folders are shown below the last virtual folder.Drum Synth devices are now grouped in their own folder within the Instruments label.The browser now receives the focus when opened via the "Cmd"+"Alt"+"B" (Mac) / "Ctrl"+"Alt"+"B" (Win) keyboard shortcut.Capture MIDIAdded MPE support to Capture MIDI.Clip/Detail View ImprovementsRemoved the Clip View Box selectors from the Clip View. The Clip box now contains controls available for both audio and MIDI clips, such as Start/End, Loop Position/Length, Clip Time Signature and Clip Groove.Clicking the triangular toggle button in the Clip View's title bar shows or hides controls previously found in the Launch box, including Launch Mode, Clip Quantization, and Follow Actions.Controls for editing samples/notes, envelopes, and note expression (for MIDI clips only) are now available in dedicated tabs to the right of the Clip box. Pressing "Alt"+"1" switches to the Sample/Notes tab, pressing "Alt"+"2" switches to the Envelopes tab, and, when a MIDI clip is selected, pressing "Alt"+"3" switches to the Note Expression tab.The Clip Gain slider has been moved below the Transpose controls, and is nowFree clip boxs, Download Free clip boxs png images, Free
The store will not work correctly when cookies are disabled. looking for ideas? Get inspired by our project tools autumn lookbook catalogues blogs have a design question? Our expert design professionals are here to help, for free. book your appointmentcommercial commercial commercial enquiries looking for installation materials? Save time and money trade catalogue monthly specials express delivery Skip to Content News Sign InCreate an Account Select Store --> Select Store Search Toggle Nav Cart account five samples for $9.95 *10% price beat guarantee *lifetime guarantee *giving back with**terms + conditions apply End-timespend over $500save$100spend over $650save$150spend over $1000save$250spend over $2000save$550spend over $4000save$1250hurry,limited time only!00 00 00 00days00 00 00 00hours00 00 00 00minutes00 00 00 00seconds Home Installation Materials Shop By Brand Clip It read more read less Sort By sort by & filter filter Sort By Price Category spacers & levelling systems 1 item show more show less Colour WHITE 4 items GREY 1 item BLACK 3 items BLUE 1 item TEAL 1 item show more show less Size 1.5MM 3 items 3MM 1 item 20MM 1 item 30-40MM 1 item show more show less Clear All view product Clip It Corner Bracket $1500 ea $2995 Was view product Clip-It Wedges Bucket 50 $2295 ea view product Clip-It Clips 1.5mm Bucket Of 150 Pieces White $2295 ea view product Clip It Spacer Wedge Stone $3000 ea $4995 Was view product Clip It Clips 3mm Subway & Herringbone Leveling Box 250 $3495 ea view product Clip It Clips 1.5mm Subway & Herringbone Leveling Box 250 $3495 ea view product Clip It Tile Levelling Pliers $3895 ea view product Clip It Mini Wedge Box 250 $4995 ea view product Clip It Wedges 30mm Stone & Paver Box 250 $4995 ea view product Clip It Wedges Black $4995 ea view product Clip-It. Step 8b: For metal boxes, press down on the Box Doctor clip and then slide the clip to the right or left locking the clip onto the damaged box. Depending on the box, slide to the Show/Hide the Clip box. Shows or hides the Clip box of the selected object. Reset. Resets the Clip box of the selected object. NOTE Multiple Clip boxes are be reset together by selecting multiple objects in the Data Properties andComments
Box button in the floating toolbar to add it to the list of saved ClipsAdjust X Axis - Set the active editing axis to the X axisAdjust Y Axis - Set the active editing axis to the Y axisAdjust Z Axis - Set the active editing axis to the Z axisClear Clip Box - Delete the the Clip Box that is being edited and close the editing session2. Clip Box adjustmentThe Clip Box adjustment control on the right-hand side of the viewing window can be used to adjust the extents and location of Clip Box along the selected axis. The buttons on the top and bottom of the slider control can be used to adjust the edges of the Clip Box. The button in the middle of the slider control can be used to adjust the location of the Clip Box. Optionally, you can manually type values into the text boxes next to each of these controls. The values should be in the same unit as the coordinate system being used.3. Clip Box RotationThe Clip Box rotation control at the top of the viewing window can be used to rotate the Clip Box along the selected axis. Moving the control to the left will rotate the Clip Box counter clockwise. Moving the control to the right will rotate the Clip Box clockwise. Optionally, you can manually type a value into the text box next to the rotation controls. The value should be between 0 and 360 degrees.Smart AlignThe Smart Align
2025-03-29You are here: Clipart Download » Check Mark Clipart For Powerpoint Clip Art Of Check - Red Check Mark In Box Check Mark Clipart For Powerpoint Clip Art Of Check - Red Check Mark In Box is one of the clipart about check mark clipart black and white,red check mark clip art,clip art check box. This clipart image is transparent backgroud and PNG format. You can download (1569x1709) Check Mark Clipart For Powerpoint Clip Art Of Check - Red Check Mark In Box png clip art for free. It's high quality and easy to use. Also, find more png clipart about check mark clip art free,box clipart,nature clipart. Please remember to share it with your friends if you like. If you find any inappropriate image content on ClipartMax.com, please contact us and we will take appropriate action. You're welcome to embed this image in your website/blog! Small size image for your website/blog: Medium size image for your website/blog: Views: 39 Downloads: 15 Resolution: 1569x1709 Name:Check Mark Clipart For Powerpoint Clip Art Of Check - Red Check Mark In Box License:Personal Use File Format:PNG PNG Size:112 KB This Free Clip Arts Design Of Bright Green Check Mark - Powerpoint Green Check Mark 600*532 26 12 Follow Up Post-event - Check Mark For Powerpoint Orange 656*656 8 2 Check Mark Clipart For Powerpoint Clip Art Of Check - Red Check Mark In Box 1569*1709 16 6 19 Check In Graphic Library Huge Freebie Download For - Check Mark Box Png 2400*2224 2 1 Red Check Mark Over Black Box - Box With Check Mark 2000*2493 14 6 Check Box Icon Tick Mark Correct Choice Ch - Check Mark In Box Icon 366*340 20 9 Photography Checklist - Green Check Mark In Box 512*512 32 18 Blue Checkmark With Box Svg Clip Arts 588 X 599 Px - Check Mark With Box 600*594 8 1 Check Mark Checkmark Clip Art At Vector Clip Art Clipartcow - Green Check Mark Box 2400*2400 13 4 Free Vector Green Check Box With Check Mark - Green Check Mark Box Png 384*332 12 5 Question Mark Check Box 600*600 5 1 Open - Purple Check Mark Box 2000*2000 6 1 Results - Check Mark In Box Clip Art 1280*1280 5 2 Check Mark In Box Icon 1024*949 4 1 Apply - Check Mark Box Png 512*512 8 3 Pros - Box With Check Mark 420*420 5 1
2025-04-04Error message. Color GeoTags by CategoryGeoTags can be rendered by category by selecting the Color GeoTag by Category button.The Color Geotag by Color dialog contains two options for rendering GeoTags. By default the Color by Category option is turned off. This disables the Category table control. The GeoTag Color control at the bottom of the dialog will be active. This control can be used to render all GeoTags as the same color. Click on the color control to open the color picker and choose a color.Truning on the Color by Category option will activate the category table control. This will display each GeoTag category in a list with a color picker for each category. GeoTag categories can be added to individual GeoTags by opening the GeoTag properties for each GeoTag in the GeoTag panel and adding a value to the Category field. GeoTags that do not have a category associated with them will be labelled as in the GeoTag symbology dialog.Touch Friendly Clip box Creation ToolsThe Clip Box creation tools have been modified so that they can be used on touch screen devices. They can be invoked the same way as in previous versions. The old controls can still be used if you prefer using them.Once a Clip Box is created, several controls will open that can be used to manipulate the clip box with a mouse or on a touch screen.1. Primary toolbarAccept Clip Box - When you are finished editing the Clip Box, click on the Accept Clip
2025-04-10